![]()
This guide is intended to instruct players in basic (and some advanced) tactics that can be employed while playing Operation: Silent Fury. Covered in this volume are many useful skills that will come in handy, though they are open to interpretation and improvisation. Take these tips to heart and you should have a clear edge over your opponents.
GETTING OFF TO A GOOD START
Before beginning the exercise, you should take a few moments to talk with your teammates about strategy, tactics and other things. Unit integrity is essential in the field and knowing your teammates, along with having a common frame of reference, allows you to better coordinate your efforts. Here are a few things to look at:
1) Establish Code Words – Use codes when you want to communicate information to your teammates without doing the same for your opponents. Code words may be used for things like team movements, enemy positions or even main fortifications or pieces of cover on the field. (I.E. “He’s on the move, headed to Big Ben!”) Make sure your code is not too easy to break, however. Fake code words are also an excellent way to confuse and disorient the enemy.
2) Get to Know the Area – Spend some time scouting out your encampment and get a feel for what's around. Learn where the best cover is or where the weakest part of your defense is. Are there any blind zones? These can be used for sneak attacks.
 Blind Zones - A Blind Zone is a series of
pieces of cover that, once aligned,
Blind Zones - A Blind Zone is a series of
pieces of cover that, once aligned,
form a solid wall when viewed from the front. Notice how these three walls
overlap to form
a screen, behind which players can travel without being seen by anyone observing
from
the front.
3) Develop Game Plays and movement strategies that your team members can use in a fight.
4) Observe the Other Team – Watch how they play. Look for flaws in tactics or weaknesses in certain players. Report these to your team members.
5) Never Underestimate Anyone! The OpFor may only be feigning weakness in a certain area to lure you into an ambush. Be observant and try to see the big picture.
6) Create Distractions – More things happening means more things the OpFor has to keep its eyes on.
7) Always Have a Backup Plan – This includes having an exit strategy ready if you have to evacuate your camp at a moment’s notice.
HOW TO BECOME INVISIBLE
1) Wear Camouflage Clothing – Camouflage-patterned clothing is designed to help break up the distinctive outline of the human body, which otherwise makes you stand out. If you do not have camouflage and cannot buy any, wear dark brown. Brown is a neutral colour that blends in with any natural environment (I.E. shadows, fallen logs, etc.) Straight brown is better than a green shirt or pants. Be careful to avoid straight black, however, as black silhouettes very easily in daylight and is not a colour commonly found in nature.
2) Stay Low – Crouch low with your feet under you, ready to move at a moment’s notice. Crouching, or lying prone, keeps you below your enemy’s line of sight, reducing your chances of being spotted.
3) Use Cover – Hiding behind a large, dense object never hurts.
4) Move with
Caution – If you have to move, do so very carefully.
Moving slowly and fluidly like a cat, or crawling, will
reduce your chances of being seen. You can also use
cover to mask your movement. Also, move only when the
opponent is not looking in your direction, but keep in
mind that peripheral vision is still good at picking up
movement. Do it nice and slow. Be careful not to touch or
disturb anything either. For example, grabbing onto a bush
for support can rustle leaves, giving you away.
5) Be Quiet –
Noise is not your friend. If you have to communicate with
your teammates, use hand signals or soft whispers. Also,
make sure you aren’t wearing anything that can make
noise (I.E. keys, chains, zippers, clothing that swishes
when you walk) or get caught on things when you move.
6) Stay Alert – Don’t get comfortable! Keep your senses keen and sharp at all times. Study the terrain and root out possible sources of enemy cover. Listen for breathing, coughs, snapping twigs, and any other giveaways. Sniff the air for sweat, deodorant or other unnatural odours. Keep your eyes open for movement, swaying branches when there’s no wind, human silhouettes, etc.
7) Keep the Sun at
Your Back – If an opponent looks your way, they’ll
be blinded. However, take care not to be silhouetted by
the sun. Keep large, dense, dark objects at your back, such
as boulders and trees.
8) Don’t Be Where You Are Expected to Be – You are never more invisible than when you are behind enemy lines. This is because the enemy does not expect you to be there. In the same vein, the closer you are to your opponent, the more invisible you become. If you follow the above tips while waiting in ambush for your opponent, it is entirely possible that your opponent will walk right up to you, or even pass you without a second glance.
GETTING YOUR A.C.T. TOGETHER
A.C.T. stands for “Angles, Communication and Teamwork.” These are the pillars that support every successful team. Although they appear to be three separate elements, they in fact come together to make for a better game strategy. Teamwork is two or more people working together to achieve a common goal. It can be as simple as two players moving together towards an objective, one keeping an opponent pinned down while the other advances, or one calling out targets, the other taking them out.
In order to work effectively with your teammates, you must all communicate with each other. Otherwise, how can your teammates know where the enemy is or how many there are? How can they know where you are if you need help? Thus, effective communication of information is vital to the success of your mission. When you communicate with your teammate, you can relay movements and the two of you can set up in positions to eliminate the enemy. Thus, communication fosters teamwork.
Angles mean everything in a skirmish. Usually, the team that uses angles most effectively, wins. For example, if there is an enemy behind cover fixated on you, you can send your teammate to a different angle and take out the opponent, coming from his blind side. Also, cover can only protect from so many directions. By gaining a new angle, you can reduce the number of directions that an opponent’s cover is useful. Thus, teamwork and communication build angles.
Thus, all three elements are inexorably linked. If you don’t communicate with your teammates, they won’t be able to make use of better angles. If they can’t make use of better angles, your opponents will take you out one by one, reducing teamwork. If there’s only one person left, there’s no one to communicate with, and so on.
DEFENSIVE TACTICS
If you or your team have been tasked with defending an area, here are some tips to help you maximize your tactical potential.
1) Get to Know the Area You Must Defend – Take a look around. If you were to attack, how would you do it?
6) Set Up Positions with Overlapping Fields of Fire – Overlapping fields of fire allow you and your teammates to cover each other.
7) Have Reserves and Reinforcements – If the enemy breaks through your perimeter, they should not have unhindered access to your flag. Make sure there is more than one line of defense.
8) If You Must Fall Back, Make it Organized – Make your opponent pay for every inch he advances.
9) “Suicide Squads” are Useful – Have a couple of volunteers hide and remain hidden while the assault is taking place. If they are not discovered, you have a team of allies behind the enemy’s positions. Do not give away their positions and don’t shoot them accidentally when they attack. Pick your targets carefully.
11) Counterattacks Work – Your roles as attacker and defender are not set in stone. While the opponents attack, they may have left their base defenseless. You can send a squad to raid their base while they are concentrating on you.
12) Know Your Objective – Never forget what your team’s mission is. You know an attack is coming, so prepare for it. Dig yourselves into position. Be ready for your opponents.
13) Never Reveal Your Maximum Tactical Capability – Don’t let your enemy know how many people are in your squad. In the context of this game, they will probably know how many are on your team but not necessarily how many are fighting at one time. Conversely, try to identify how many people will be in the attacking squad. That will let you know how many you have dealt with. Also, don't reveal the extent of your equipment and resources. A hidden cache of weapons, for example, can be the deciding factor in a skirmish.
14) Remember, the Best Defense is a Good Offense – Take the initiative. Attack first, if you're ready, and don't wait for them to make the first move.
AMBUSH TACTICS
There are several things to keep in mind if you want to perform a successful ambush. First, there is no such thing as an impossible ambush. Given enough time, any area can be made into a suitable ambush site. Secondly, an ambush is not a defensive tactic. Ambushes are offensive even though it may seem like you are taking up defensive positions.
There are two kinds of ambushes, planned ambushes and ambushes of opportunity. Planned ambushes require lots of intelligence about the enemy’s location, team strength, direction of travel, speed, etc. They are coordinated ahead of time and the ambush team arrives at the site early and has plenty of time to set up. Ambushes of opportunity can take place when a team unknowingly stumbles onto an OpFor and decides to take them by surprise. In this instance, the ambushing team must be swift, silent and invisible, so as not to alert the enemy as they set up. With that said, here are some ways to set up an ambush.
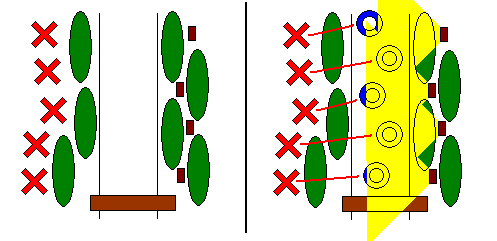
The Linear Ambush
The Linear Ambush is the most basic type of ambush, where the ambush team (the red X's) blocks off a section of path to prevent the OpFor from escaping, then sets up on one side of the path to wait behind cover. Often, the opposite side of the path will be mined (the small rectangles) to prevent the OpFor from taking cover there. When the OpFor (the blue O's) arrives, the mines are triggered and the ambush team opens fire.
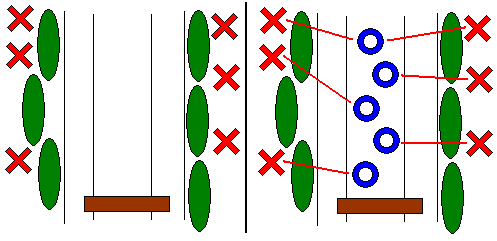
The Parallel Ambush
The Parallel ambush is also used on straight paths where the ambush team splits into two lines and sets up across from each other. In order to prevent themselves from shooting each other, the ambush team usually sets up on higher ground, thereby firing down upon the OpFor instead of across at each other.
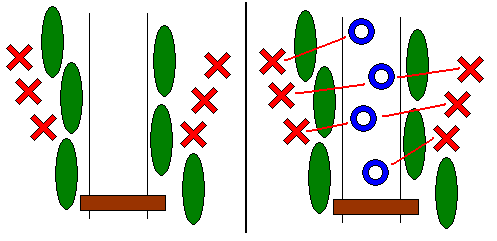
The “V” Ambush
The “V” formation, also known as the fatal funnel, is a variation of the Parallel Ambush. The ambush team sets up in a V with the open end facing where the OpFor will be coming from. When the OpFor arrives, the ambush team allows the point man to pass through so as not to alarm the others before opening fire. The ambush team may also choose to take up positions on higher ground for this ambush type as well.
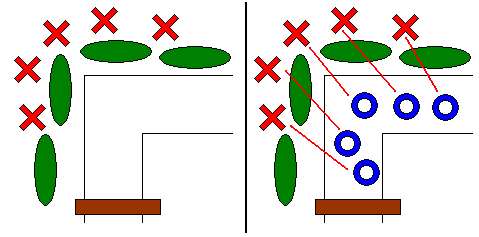
The “L” formation
is used where there is a bend in the path. The ambush
team blocks off the path to prevent escape, then splits into two lines and sets up along the path behind cover.
“Divide and conquer” is another valuable tactic when considering an ambush. By using two teams, one can attack from the front while the other attacks from behind. The OpFor is sandwiched between two teams and have to engage both at once. This means the OpFor will be too busy to help each other out, since both fronts will be engaged. A third ambush team can also be used to attack the flanks, adding more confusion to the mix.
COUNTER-AMBUSH TACTICS
Remember the first point about ambushes? There is no such thing as an impossible ambush. If you are in the field, you must stay alert at all times and never assume for a moment that you are safe from attack. This is not to say that you have to bear all the responsibility on your own. That’s what teammates are for. The most effective way to guard against ambushes is to have an effective patrol formation.
Perhaps the most important part of any formation is the pointman. This is the person that scouts ahead, often by just several meters, and alerts the team to any trouble. S/he must stay within visual range of his team but not so close that s/he has no time to warn the team of any danger. The pointman typically scans from the 10 o’clock to 2 o’clock positions. A pointman must have excellent vision and attention to detail. S/he must be able to spot things that are out of place at both long and short ranges, such as silhouettes, footprints, disturbed foliage, etc. The person on point must also have excellent hearing in order to pick up sounds of movement, breathing, and even the sounds of nature. Nature is probably the best indication of what’s going on because the animals know better than you when everything is safe. A flock of birds suddenly flying off up ahead or a squirrel darting up a tree can all be indications of trouble further on. The pointman must be able to hear and interpret these signals. A good sense of smell is also helpful, if the pointman can pick up sweat, cologne, perfume, or anything else out-of-place.
Behind the pointman, the rest of the team should stagger their formation. The second person in the patrol should be about 5–10 meters behind and to the left of the pointman and scan from his/her 7 o’clock to 10 o’clock positions. The third person should be 5-10 meters behind and to the right of the second, and cover the 2 o’clock to 5 o’clock positions. The last one in the formation is designated rear guard, and covers the team’s backside. S/he scans the 5 o’clock to 7 o’clock position and is also responsible for covering the team’s tracks and making sure the enemy doesn’t attack from behind. If there are more than four people on the team, the remainder can stagger their formation behind the third person and in front of the rear guard. The ones in the middle can also divide up the area to cover.
Patrols should stop frequently and the team members duck and take cover behind the closest available object. They should continue to monitor their zones and if the enemy is spotted, they should warn the squad with the direction from where the threat is (I.E. “Contact, left!”). The same goes for movement (I.E. “Movement, right!”). The team should then all turn to face the threat, but maintain their positions. Beware of secondary forces, however.
When moving, the team should stay together and move at a comfortable pace. Don’t rush! They should also stay under cover and try not to stray into the open. If the team must cross an open area, they should do so one at a time, with the rest of the squad covering the one moving. Also, study the terrain and try and identify possible ambush sites.
Now, if you have this formation down pat and you still get caught in an ambush, don’t worry. Stay calm and focused. Don’t everyone dive for cover and keep their heads down all at once because the ambushers have chosen their ambush site and most likely has very little available cover. Instead, return fire immediately and try to overwhelm your opponents and get their heads down. That way, you can start to make your way out of the kill zone.
Getting out of the kill zone is your first priority. The team must be able to quickly exit the kill zone while returning fire. Any team members not in the kill zone at the start of the ambush should take immediate cover and try to lay down suppressive fire until the enemy retreats, is neutralized or the team gets out of the kill zone. Once that happens, you can continue engaging the enemy from the safety of cover, or retreat yourselves. Either way, you get out in one piece.
BOOBY TRAPS AND EARLY-WARNING SYSTEMS
Historically, booby traps have been very effective tools for decimating enemy forces as well as battering their morale. The threat of sudden and impersonal death waiting around every turn is a potent psychological warfare tool. For the purposes of this game, however, since the purpose is not to kill or injure, early warning systems (EWS) are used in place of booby traps. EWS are used to alert your forces that the enemy is on the way, or to indicate the enemy’s direction of travel. Here are some examples of simple EWS and how they work:
- Cap gun caps placed on the trail under rocks will make a pop when the OpFor walks on them, alerting you to their presence.
- A tripwire strung across a path, 4" to 6" off the ground and attached to a tin can with rocks in it will make a loud clanging noise when the trip wire is activated.
Placing EWS around your camp and along routes of travel are a good way to alert you to any enemy presence, especially if they are practicing effective noise discipline.
MAPS
Never underestimate the value of maps. When you reach your new encampment and have a chance, make a rough map of the area to learn more about it and plan strategy. Maps can be as simple as stick drawings in the dirt with leaves for bunkers and rocks for players. Plan strategies, mark escape routes and plot fortifications.
If you send a scout to observe the OpFor’s base, have them make a map. Locate entry and exit points. Know how to get past their fortifications. Know where their booby traps are. Pictures are always useful for communicating information. Use them to plan your attacks or raids. Just remember, don’t let your maps fall into enemy hands!
HAND SIGNALS
When there's a need for silent communication, nothing can beat hand signals. Used properly, a captain can convey complex battle orders to their team, or a scout can deliver an entire intelligence report, all without saying a word, which makes them less likely to be overheard. Here are some of the more common ones.
![]() All Clear (or No Enemy in Sight) - Fist clenched, thumb extended upwards
("Thumbs up").
All Clear (or No Enemy in Sight) - Fist clenched, thumb extended upwards
("Thumbs up").
![]() THEN
THEN  Enemy in Sight (or Enemies Near)
- Fist clenched, thumb extended downwards ("Thumbs down"), then point
to the enemy's location.
Enemy in Sight (or Enemies Near)
- Fist clenched, thumb extended downwards ("Thumbs down"), then point
to the enemy's location.
 OR
OR  Form
on Me (or Everybody Come Here) - One hand held flat on the top of the head,
or index finger raised and circled around ("Circle the Wagons!").
Form
on Me (or Everybody Come Here) - One hand held flat on the top of the head,
or index finger raised and circled around ("Circle the Wagons!").
 THEN
Form an Ambush - Flat, open
hand covering eyes, then point to the ambush setup location.
THEN
Form an Ambush - Flat, open
hand covering eyes, then point to the ambush setup location.
 OR
OR  Stop (or
Stay Put) - Fist clenched, raised at shoulder level, or open-palmed hand,
raised at shoulder level.
Stop (or
Stay Put) - Fist clenched, raised at shoulder level, or open-palmed hand,
raised at shoulder level.
 Listen Up - Hand cupped to ear.
 THEN
Obstacle Ahead - Hands crossed
over chest, then point to the obstacle's location.
THEN
Obstacle Ahead - Hands crossed
over chest, then point to the obstacle's location.
 Get Down (or Lie Flat, or Crawl) -
Open hand, palm to the ground, move hand down.
Get Down (or Lie Flat, or Crawl) -
Open hand, palm to the ground, move hand down.
 Hustle (or Hurry Up!) - Clenched fist raised at shoulder level, pumped up
and down.
Hustle (or Hurry Up!) - Clenched fist raised at shoulder level, pumped up
and down.
 THEN
Recon - Hands holding an
imaginary pair of binoculars to eyes, then point to the direction to go.
THEN
Recon - Hands holding an
imaginary pair of binoculars to eyes, then point to the direction to go.
 THEN
Attack - Open hand in a cutting
gesture across throat, then point to direction of intended attack.
THEN
Attack - Open hand in a cutting
gesture across throat, then point to direction of intended attack.
 Cover (or Give Me Cover) - Open hand, palm down, waved back and forth
over the head.
Cover (or Give Me Cover) - Open hand, palm down, waved back and forth
over the head.
 THEN
Deploy - Open hand in a sweeping
motion, then point to where the team should deploy.
THEN
Deploy - Open hand in a sweeping
motion, then point to where the team should deploy.
 Observe (or Be Observant) - Two fingers pointed at eyes.
THEN
Look Over There - Two fingers pointed at
eyes, then point to where you want the person to look.
 Booby Trap - Hand cupped as if holding an apple, other hand pointing to
location of trap.
Booby Trap - Hand cupped as if holding an apple, other hand pointing to
location of trap.
*Finger Snap* Give Me Your Full Attention - This is the only audible "hand signal".
Here are the hand signals for numbers:
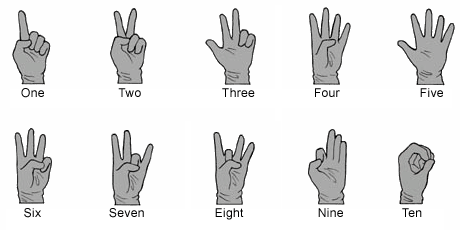
These can be used to assign numbers to your teammates (I.E. "Team One, recon that hill, Team Two, set up an ambush over there and Team Three give me cover!"), indicate the number of enemies at a location, etc.
So once you’ve received your orders, how can you communicate whether you’ve understood or not? Here’s how:
"I Understand" - Make a ring with your thumb and index finger and splay out the other fingers ("OK" gesture)
"I Don’t Understand" - With an open hand, move it back and forth, palm out, in front of you, as if waving goodbye.
If it becomes absolutely necessary to speak, move your lips as close as possible to the listener's ear and speak only in quiet whispers.
CAMOUFLAGING YOUR CAMP
Seeing as the main objective of the game revolves around you finding the opponent’s camp (and vice versa), camouflaging your camp is a valuable advantage. If your opponent cannot find you, they cannot steal your flag. Here are some ways to keep your camp better hidden.
First, it's usually a good idea to camouflage the tents. Being the large, colourful, straight-edged structures that they are, they tend to stick out in a woodland environment. Military surplus camouflage netting is pretty good for an application like this but it isn't a one-step solution. One way to supplement the netting is to first set up the tent close to the tree-line, or among the trees if possible. Next, use underbrush, sticks, branches, leaves and dirt to make a base layer over the tent. This will help to disguise and disrupt the tent's silhouette, as well as breaking up the bright colours. Then, when the camouflage netting is put over the entire assembly, it stands a much lower chance of being spotted.
Secondly, fortifications are a must if the team intends to occupy the camp for an extended period of time. These will provide good cover and ambush spaces if the OpFor attacks. Using scavenged natural materials like logs, foliage, brush, sticks and mud to build them is the best idea for several reasons; it is eco-friendly (as long as the materials are already dead), it is difficult to spot, and the enemy may not even realize they're there.
Building a recon post is also a good idea. Dig a small pit in the ground large enough for a person to lie in that overlooks the water, the main path or some other major throughway. Use the excavated dirt to build up a parapet and use sticks and leaves to build a frame to support an overhead canopy. Draping a camo blanket and foliage over the assembly is a simpler way to achieve the same effect. This post should be built close to or in the underbrush to maximize natural cover. Arm the person inside with a pair of binoculars and a radio and if the enemy approaches, they can warn the team to get down and stay low.
Thirdly, the team must be careful not to draw attention to themselves. Lighting fires, talking loudly, moving carelessly, making unnecessary noise or otherwise being generally lousy campers are sure-fire ways to compromise their position.
Lastly, the team has to realize that by clustering together in one location, they are making themselves easy targets for the enemy. A rotating schedule of guard patrols is always a good idea. Having even just two people on the lookout while the others sleep can mean the difference between success and failure.
SWIM BUDDIES
"Swim Buddy" is a term borrowed from the U.S. Navy SEALs which refers to the person who is your partner. No player should ever be without his or her swim buddy. Also referred to as "fireteams" or "fire and maneuver teams", swim buddy pairs are designed to be autonomous and maneuverable and should be able to operate as a seamless unit, fully knowing their partner’s strengths and weaknesses, capabilities and discomforts. Your swim buddy is the person who knows you like the back of his hand and whom you know just as well.
The best teams are comprised of even numbers, such that everyone gets a swim buddy, even the captain. Swim buddies should always be watching their partner’s back, knowing full well that their partner is doing the same for them. When going into battle, it is important to stick with your swim buddy. This should be a bond that nothing on earth can break.
When choosing a swim buddy, try to choose someone whose skills complement your own. For example, if you can’t swim but are a good stalker, it would be advisable to team up with someone who is comfortable in the water and can operate efficiently. That way, all bases are covered. Keep in mind that you will be spending a lot of time with your swim buddy, so make sure the person you choose is someone you can put up with.
Lastly, a note for team captains. It is highly inadvisable to pair two people together as swim buddies if they are dating. Predictably, they will spend more time scouting out each other than the area they are assigned.
GUARD PATROLS
Guard patrols are important to have in a hostile environment. The enemy is omnipresent and can strike at any given moment. Guards give the people who are resting the peace of mind to do so.
A guard has many duties, the most important of which is keeping the camp secure. Patrolling the perimeter of the camp is a good way to ensure its security. It’s crucial also not to stray too far from your swim buddy. In the event of an ambush, if one of you is taken out, your partner must know and be able to warn the other teammates.
Generally, if the camp is small enough, it’s not a problem. When you are on guard duty, try to keep within visual range of your partner at all times. This goes for both day- and nighttime shifts.
Do your rounds often but not in a predictable pattern. Enemy scouts watching should not be able to plan assaults based on predicting where you will be at a certain time and then slipping through behind you. Vary your routine and don’t get caught in a rut. Your teammates will thank you.
Duty shifts are important during longer games where players will invariably get tired of being on edge all the time. By assigning a duty period followed by a rest period, players on guard patrol get a chance to relax and recuperate.
Based on the number of players on a team, the twenty-four hour day is broken up into two twelve-hour sections. Then, each section is further broken up into a duty period and a rest period for each pair of players. For a 6-person team, the absolute minimum number of players for an O:SF team, the twelve-hour section can be divided into a four-hour duty period and an eight-hour rest period, like so:

For an 8-person team, the twelve-hour section can be divided into a three-hour duty period and a nine-hour rest period, like so:

Depending on the number of players on your team, these systems may be adjusted accordingly. Generally, the more people on your team, the less hours each pair of swim buddies has to spend on duty. It’s important to note, though, that the enemy can strike at any time. The pair on duty serves primarily as a watchful eye and every other member of the team must be prepared to go to battle at a moment’s notice.
EFFECTIVE LEADERSHIP
Okay, so you’ve been elected Captain. Congratulations. But what does this mean? You’re in charge of your people, so what do you have to do? What makes a good leader? Here are some things that an effective leader should keep in mind.
1) Always be aware of the big picture. Don’t get too focused on a fight and start getting tunnel vision. Make sure you know everything that’s going on around you.
2) Keep your squad focused on the task at hand. Focus on what’s important. If a bunch of enemies come out of the woods but don’t see you, don’t waste your time and man power taking them out before getting the flag. Go for the points.
3) Lead from the front, but not literally. A good leader never asks his or her people to do something s/he is unwilling to do first. However, if you’re in a firefight, don't go charging off blindly into battle. After all, if you get hit, who’s going to lead your squad? Stay near the back of the formation and far enough that you don’t get hit, but close enough that you can still command.
4) Always have a plan. A bad plan is better than no plan at all. If nobody knows what they’re doing, they cannot operate effectively. Know the terrain, know your squad mates, know their strengths and weaknesses, know YOUR strengths and weaknesses. Use them to your advantage.
5) Always listen to your subordinates. You may be leader but you still aren’t God. You can’t know everything and you can’t think of everything. Input from your subordinates should be taken seriously. Often, they have a point.
6) Don’t let it get to your head. The leadership role is a good one to have, but don’t get too full of yourself. Remember that your squad mates are human beings, not machines. You can’t work them too hard and you have to take care of them. In return, they will do the same for you.
7) Delegate authority. Good leaders are not dictators. By delegating authority to your subordinates, it gives them responsibilities and also takes a load off your shoulders. Don't micro-manage and let your subordinates do their job with minimal interference.
8) Encourage mistakes. Mistakes are a learning opportunity. You should not punish your people for making them, but what you should punish is if someone makes the same mistake twice.